Object Location Worksheets


About These 15 Worksheets
Our object location worksheets help young learners understand where things are placed in relation to other objects. Through activities that include top or bottom position, as well as “in,” “on,” “under,” and “next to,” students build a clear sense of spatial awareness. For example, a worksheet might show a ball next to a box or a teddy bear under it, and children are asked to describe each object’s position. These exercises make learning location words simple, visual, and engaging.
These worksheets are valuable tools in the development of spatial reasoning skills, which are important in everyday life and in fields such as geometry, physics, engineering, art, and more.
They may also involve map reading exercises, which are more complex and involve understanding object locations on a larger scale. This might involve identifying the location of landmarks on a city map or geographical features on a country map. These exercises help develop understanding of geography and navigational skills.
About Each Worksheet
Right Location
This worksheet helps students learn the difference between left and right through simple but engaging activities. Children circle objects based on their position and even identify which hand they use for writing. The hands-on tasks encourage students to connect directional words with their own bodies and surroundings. It’s especially useful for young learners who are still figuring out which side is which without accidentally pointing both directions at once. By the end, students gain stronger spatial awareness and a little extra confidence in using directional language.
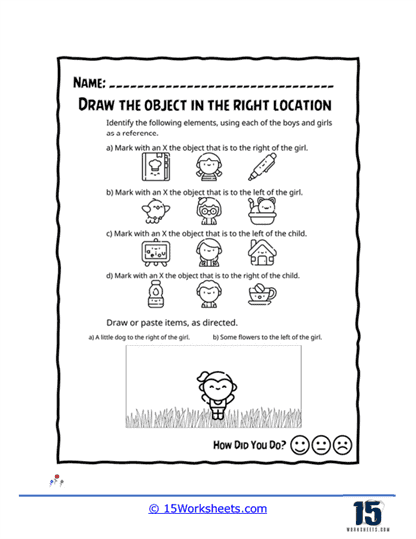
Place It Right
Students practice identifying left and right positions by looking at pictures of children and objects placed around them. The worksheet includes circling, marking, and drawing activities that keep learners active and involved instead of simply answering questions. By placing kites and flowers in specific locations, students strengthen their understanding of spatial directions in a practical way. It’s a wonderful early learning activity for helping children connect words like “left” and “right” to real visual situations. Plus, adding drawings makes the worksheet feel a little like a mini art project.
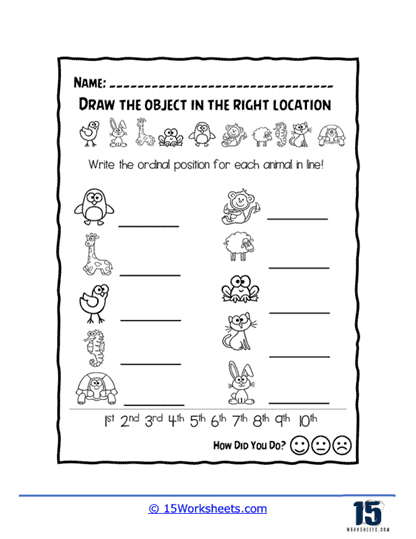
Ordinal Places
This worksheet introduces students to ordinal numbers like first, second, third, and beyond using a line of adorable animals. Children study the order of the animals and write the correct ordinal position for each one. The activity strengthens sequencing skills while also expanding vocabulary and understanding of order. It’s a fantastic way to show students that numbers are not only for counting but also for describing positions in a sequence. Honestly, lining up animals automatically makes learning feel more fun.
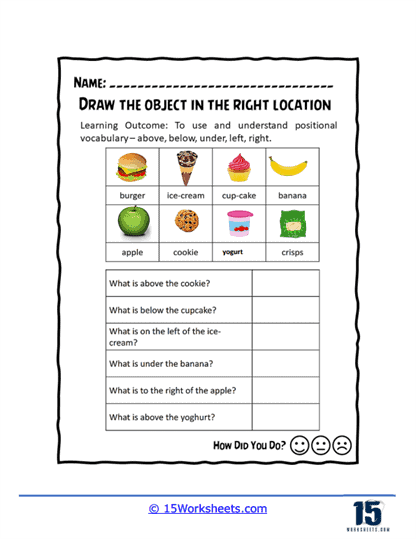
Position Vocabulary
Students use a picture grid filled with tasty-looking food items to answer questions involving words like above, below, left, and right. The activity encourages careful observation as learners compare the positions of different objects. It’s excellent practice for building both spatial awareness and descriptive language skills at the same time. Teachers can easily use it during language lessons, math centers, or early critical-thinking activities. Plus, using snacks as examples keeps the worksheet playful and relatable.
Explain the Legend
This worksheet uses colorful shapes and symbols to help students practice positional vocabulary in a visual and engaging way. Learners answer questions about which shapes are above, below, between, or beside one another on a grid. The bright colors and clear layout make the activity approachable while still challenging students to think carefully about spatial relationships. It’s a strong introduction to geometry-related language and observation skills. Students basically become little detectives searching for clues among shapes.
Where It Belongs
This worksheet focuses on words like “in front,” “behind,” and “between” by asking students to study pictures and describe object locations. Each image provides a visual clue that helps children determine the correct positional relationship. Writing the answers strengthens vocabulary, sentence-building, and communication skills all at once. It’s especially useful for helping students explain what they see in a clear and organized way. By the end, students become much more confident describing locations around them.
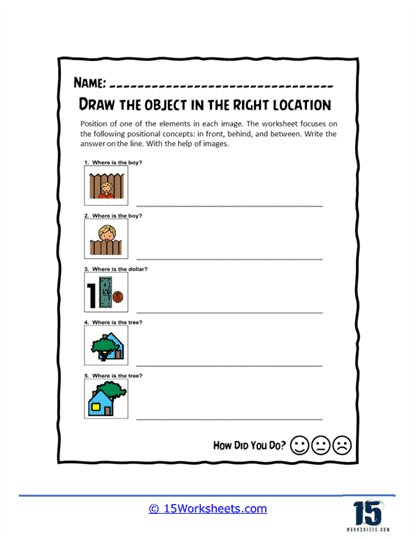
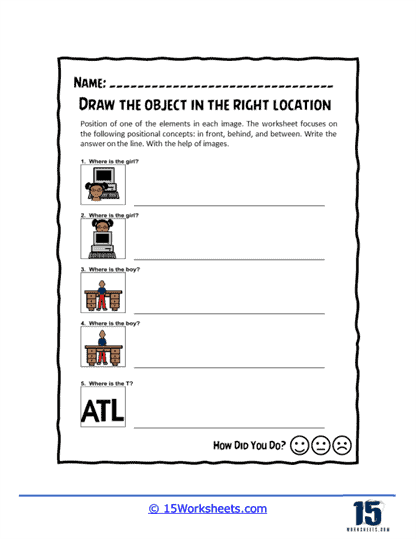
Element Position
Students analyze simple images and decide where one object is positioned in relation to another. The worksheet encourages careful thinking as learners choose positional words like “behind” or “in front of” to describe each scene. Because the pictures are simple and familiar, children can focus fully on understanding the relationships between objects. This activity helps strengthen both spatial reasoning and descriptive writing skills. It’s a calm and effective way to build important early vocabulary.
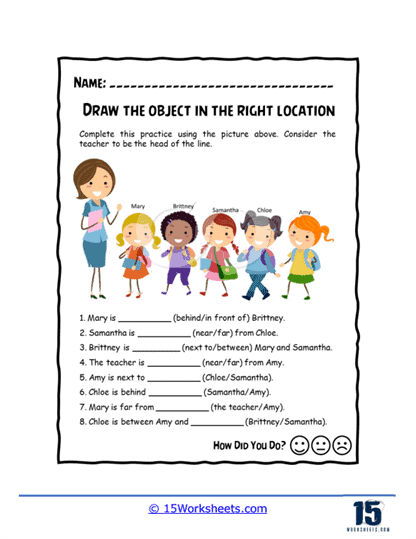
Focused Concepts
This worksheet challenges students to describe where a boy or girl is positioned in relation to a bookcase. Each picture presents a slightly different arrangement, helping children practice a variety of positional terms. Writing responses encourages students to connect visual information with accurate descriptive language. It’s excellent practice for observation skills and early sentence formation. Best of all, the repeated structure helps learners gain confidence with spatial vocabulary through steady repetition.
Help the Images
Students study scenes featuring buses, bushes, and people, then describe where the objects are located in relation to one another. The worksheet strengthens understanding of directional and positional language using clear visual examples. Writing responses helps learners organize their thoughts and communicate spatial ideas more effectively. This activity works especially well for improving both language comprehension and visual reasoning skills. It’s basically a little storytelling exercise hidden inside a position lesson.
Line in Class
This worksheet teaches students how to use prepositions like “behind,” “between,” and “next to” by analyzing a line of classmates. Children study the order of the students and fill in blanks using the correct positional terms. The activity helps strengthen grammar skills while also building understanding of spatial relationships. It’s an excellent combination of language arts and logical thinking practice. Students quickly realize that standing in line can actually teach a lot about vocabulary.
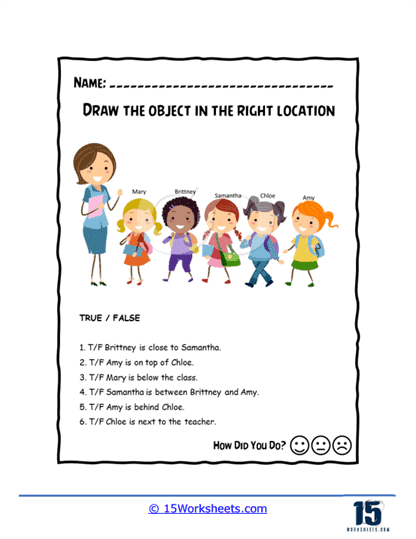
Truth of Student Position
Students examine a lineup of children and decide whether statements about their positions are true or false. The worksheet encourages careful observation and critical thinking because learners must analyze each description closely. It introduces and reinforces positional vocabulary in a more interactive problem-solving format. This activity is great for improving attention to detail while helping students become more confident using descriptive language. It’s like a tiny detective challenge mixed with grammar practice.
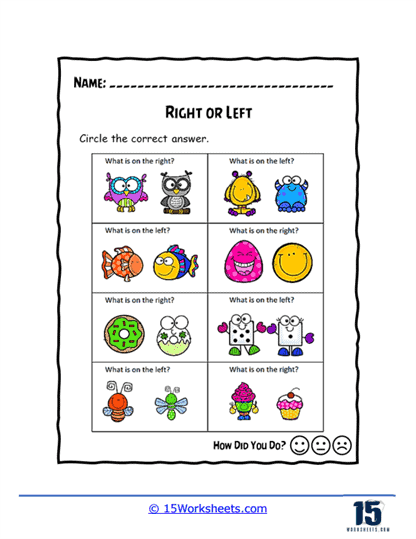
Compare the Two
This worksheet gives students practice identifying left and right by comparing pairs of colorful objects or characters. Children answer questions asking what is located on the left or right side of the page. The repeated comparisons help strengthen directional understanding through simple visual exercises. The playful illustrations keep the activity engaging for younger learners who benefit from colorful and interactive materials. It’s a cheerful way to build important spatial awareness skills.
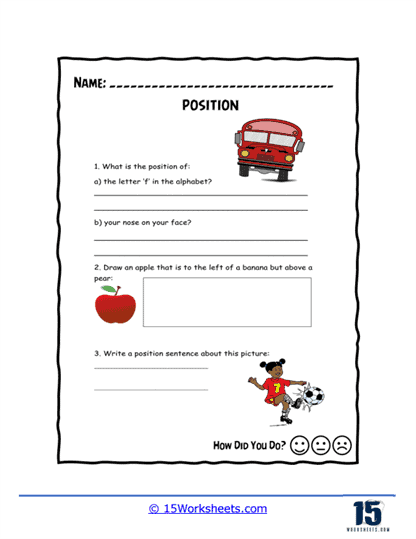
Essence of Position
This worksheet explores positional concepts through several different activities, including identifying positions, drawing objects, and writing descriptive sentences. Students think about locations in relation to the alphabet, their own body, and pictures on the page. The variety keeps the worksheet interesting while helping children practice spatial thinking in multiple contexts. It’s especially helpful for connecting positional language to both personal experience and visual understanding. Students end up using creativity and logic at the same time.
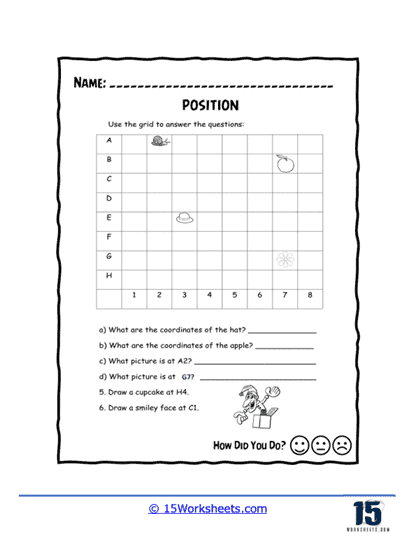
Within the Grid
This worksheet introduces students to coordinate grids by using letters and numbers to identify object locations. Children practice finding coordinates and even draw objects at specific points on the grid. The activity serves as an excellent beginner introduction to mapping, geometry, and organized spatial thinking. It encourages careful observation and helps students understand how positions can be described mathematically. Basically, it’s a tiny treasure map disguised as a worksheet.
Five Table Sentences
Students look at a classroom scene and write five sentences describing where objects are located. The worksheet encourages learners to use positional vocabulary naturally within complete sentences instead of isolated answers. This strengthens writing skills, grammar, and descriptive language all at once. It’s an excellent bridge between visual observation and organized written communication. By the end, students become little classroom tour guides explaining where everything belongs.
How Do You Describe The Location of an Object?
To describe the location of an object, you can use position words, also known as prepositions, which indicate the spatial relationship between the object and other reference points. Here are some tips on how to describe the location of an object effectively:
Choose a Reference Point – Select a clear reference point that helps define the object’s location. The reference point can be another object, a person, or a specific area or landmark.
Use Position Words – Use clear position words, also called prepositions, to describe where an object is in relation to something else. Common examples include above, below, beside, between, in front of and behind, near, far, inside, outside, on, and under. These words help make descriptions more precise and easier to understand.
Be Specific – Provide additional details to help clarify the object’s location, such as distance, orientation, or other distinguishing features.
Use Cardinal Directions – If necessary, incorporate cardinal directions (north, south, east, and west) to give a more precise description of the object’s location, especially when describing larger areas or outdoor locations.
Describe the Object – Briefly describe the object itself, including its color, shape, size, or any other noticeable characteristics to help the listener or reader easily identify the object you are referring to.
Here’s an example of describing the location of an object:
“The red ball is on the table, near the window, slightly to the left of the vase.”
In this example, the reference point is the table, and the position words used are “on” and “near.” The description also includes additional details such as the color of the ball (red) and its orientation in relation to the vase (slightly to the left).
By following these tips and using clear language, you can effectively describe the location of an object to help others understand its position in a given space.